Have you ever downloaded a picture from Google?
Or taken a screenshot of someone’s artwork?
Or copied a song from the internet?
If yes…
Then let me ask you something.
Did downloading that image make you its owner?
The answer is No.
You may have the file on your computer…
but you do not own it.
Now imagine a digital system where everyone in the world can instantly verify who the real owner is—without asking Google, Facebook, OpenSea, or any government.
That is exactly what NFT technology was designed to solve.
Unfortunately…
Most people think NFTs are simply expensive JPEG images.
Some believe NFTs are scams.
Others think NFTs are just profile pictures that rich people buy for millions of dollars.
The truth is completely different.
An NFT is not just an image.
An NFT is a digital ownership certificate secured by blockchain technology.
Once you understand how NFTs actually work…
you’ll realize that the picture itself is only a tiny part of the entire system.
Behind every NFT is a combination of:
- Blockchain
- Smart Contracts
- Metadata
- Cryptography
- Digital Signatures
- Wallets
- Decentralized Storage
- Marketplaces
- Ownership Verification
In this guide, we’ll explain everything from the ground up using simple language and real-world examples—so even if you’ve never used an NFT before, you’ll understand exactly what happens behind the scenes.
Why Were NFTs Created?
Before we understand how NFTs work, we first need to understand why they were invented.
Every new technology solves a problem.
Bitcoin solved the problem of transferring digital money without banks.
Ethereum solved the problem of programmable digital contracts.
NFTs solved the problem of digital ownership.
Think about digital content today.
Photos.
Videos.
Music.
Documents.
Games.
Art.
Everything can be copied.
In fact…
Copying a digital file costs almost nothing.
You can create one copy.
Ten copies.
One thousand copies.
Or even one million copies.
The quality never changes.
That’s the biggest difference between physical and digital objects.
If someone copies your house…
they don’t suddenly own your house.
If someone prints a photo of the Mona Lisa…
they don’t own the original painting.
But on the internet…
there was never a reliable way to prove who owned the original digital asset.
This became a huge problem for creators.
Artists.
Game developers.
Photographers.
Musicians.
Collectors.
Everyone faced the same issue.
Anyone could copy their work.
Anyone could upload it elsewhere.
Anyone could claim ownership.
There was no universal system for verifying who actually owned the original digital item.
NFTs were created to solve this exact problem.
The Biggest Problem of Digital Ownership
Let’s understand this with a simple example.
Imagine you paint a beautiful digital artwork.
It takes you three months to complete.
You upload it online.
Within a few hours…
Thousands of people download it.
Some upload it on other websites.
Some use it as wallpapers.
Some sell prints.
Some even claim they created it.
Now imagine you’re trying to prove that you are the original creator.
How do you do it?
You might show:
- Photoshop project files
- Creation date
- Social media posts
- Hard drive backups
But none of these create a globally accepted proof of ownership.
Different websites store different information.
Different companies have different databases.
If one website shuts down…
your proof may disappear.
This is where blockchain changes everything.
Instead of trusting one company…
ownership is recorded on a decentralized blockchain that anyone can verify.
No single company controls it.
No single person can modify it.
No one can secretly change the ownership history.
This creates something the internet never had before:
Verifiable Digital Ownership.
Why Copying Digital Files Was Always Easy
Many beginners ask an important question.
“If I can still copy an NFT image, then what is the point?”
This is one of the biggest misconceptions in crypto.
Let’s compare two situations.
Physical Painting
Suppose someone owns the original Mona Lisa painting.
Millions of people have photos of it.
Millions of people have posters.
Millions of people have wallpapers.
But everyone knows those copies are not the original painting.
Exactly the same thing happens with NFTs.
Anyone can:
- Download the image
- Screenshot the NFT
- Save it on their phone
- Print it
But none of those people own the NFT.
They only own a copy of the image.
The blockchain always knows who owns the original NFT token.
That is the difference between:
- Copying a file
- Owning the asset
These are two completely different things.
This single idea is the foundation of the entire NFT ecosystem.
How NFTs Changed Digital Ownership Forever
NFTs introduced something revolutionary.
Instead of asking a company:
“Who owns this?”
Anyone can simply check the blockchain.
Ownership is public.
Transfer history is public.
Creation date is public.
Wallet address is public.
Transaction history is public.
Everything is transparent.
This makes digital ownership similar to owning physical property.
Imagine buying a house.
The government keeps official ownership records.
With NFTs…
the blockchain becomes that ownership registry.
Instead of a paper document…
ownership exists inside a decentralized blockchain.
Nobody can secretly change it.
Nobody can forge it.
Nobody can delete it.
And anyone in the world can verify it within seconds.
This simple idea completely changed how people think about digital assets.
It opened the door for:
- Digital art
- Gaming assets
- Virtual land
- Music ownership
- Collectibles
- Membership passes
- Event tickets
- Identity systems
- Intellectual property
- Real-world asset tokenization
But understanding the concept is only the beginning.
The real magic starts when we look behind the scenes and see what actually happens when an NFT is created.
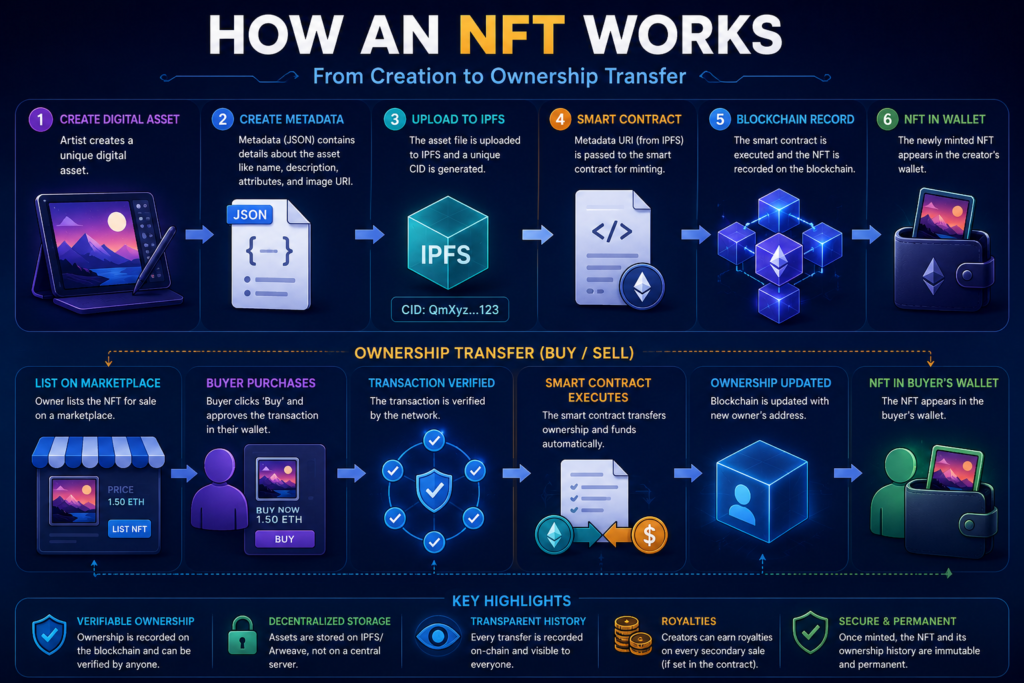
The Complete NFT Workflow (Overview)
Before diving into technical details, here is the complete lifecycle of an NFT.
Artist Creates Artwork
│
▼
Metadata is Generated
│
▼
Image Uploaded to IPFS
│
▼
Smart Contract is Used
│
▼
NFT is Minted
│
▼
Blockchain Records Ownership
│
▼
NFT Appears in Wallet
│
▼
Listed on Marketplace
│
▼
Buyer Purchases NFT
│
▼
Ownership Transfers Automatically
At first glance, this process may look simple.
In reality, every single step involves powerful technologies working together.
In the next part, we’ll go behind the scenes and explain exactly what happens during each stage—from creating the artwork to generating metadata, uploading files to IPFS, interacting with smart contracts, and minting the NFT on the blockchain.
Behind the Scenes: What Actually Happens When an NFT Is Created?
Now that you understand why NFTs were invented, it’s time to answer the most important question.
What actually happens when someone creates an NFT?
Most beginners imagine something like this:
Image → Upload → NFT Created
Unfortunately…
That is not how NFTs work.
In reality, creating an NFT involves multiple technologies working together.
A single NFT may interact with:
- Digital Files
- Metadata
- JSON
- IPFS
- Smart Contracts
- Wallets
- Blockchain
- Cryptographic Signatures
- Token IDs
All of these components combine to create a single NFT.
Let’s understand every step one by one.
Step 1 — Creating the Digital Asset
Everything starts with a digital asset.
An NFT is not limited to images.
It can represent almost anything digital.
For example:
- JPEG Image
- PNG Artwork
- GIF Animation
- MP4 Video
- Music File
- 3D Model
- Game Character
- Virtual Land
- Membership Card
- Event Ticket
- University Certificate
- Digital Identity
Imagine an artist creates this image.
Galaxy Dragon.png
The image itself is just a normal file.
Nothing special.
Nothing blockchain-related yet.
At this stage…
it is simply a file stored on the artist’s computer.
Just like any other image.
This is an important point.
The artwork itself is NOT the NFT.
The NFT comes later.
Step 2 — Creating Metadata
This is where most beginners become confused.
After creating the artwork…
the creator also creates something called Metadata.
Think of Metadata like an ID card.
Imagine buying a new car.
The car is one thing.
Its registration certificate is another.
Similarly…
The artwork is one thing.
Its metadata is another.
Metadata describes everything about the NFT.
Typical metadata contains:
- Name
- Description
- Creator
- Collection Name
- Image Location
- Token Properties
- Attributes
- External Links
A simplified NFT Metadata looks like this:
{
“name”: “Galaxy Dragon”,
“description”: “Limited Edition NFT”,
“image”: “ipfs://QmXYZ…”,
“attributes”: [
{
“trait_type”: “Background”,
“value”: “Blue”
},
{
“trait_type”: “Rarity”,
“value”: “Legendary”
}
]
}
Don’t worry if this looks technical.
Let’s understand it in simple language.
“name”
The name displayed on marketplaces.
Example:
Galaxy Dragon
“description”
Short explanation about the NFT.
Example:
First NFT Collection by Coin Alert.
“image”
This is one of the most important fields.
Notice something interesting.
It does NOT contain the image itself.
Instead…
it contains a link pointing to the image.
This is extremely important.
We’ll understand why in the IPFS section.
“attributes”
These are characteristics.
Gaming NFTs use them heavily.
For example:
Sword Level
Power
Speed
Background
Eyes
Weapon
Hair
Color
These attributes determine rarity.
That’s why two NFTs from the same collection can have completely different market values.
Real World Example
Imagine buying a passport.
The passport contains:
Your Name
Photo
Nationality
Passport Number
Date of Birth
Expiry Date
Similarly…
Metadata contains information describing the NFT.
The blockchain reads this metadata whenever someone views the NFT.
Step 3 — Why Images Are NOT Stored on Ethereum
This surprises almost everyone.
Most beginners believe this.
“My NFT image is stored on Ethereum.”
This is wrong.
Ethereum does not store JPEG files.
Ethereum stores transactions.
Smart contracts.
Balances.
Ownership records.
But not large media files.
Why?
Because storing files directly on Ethereum is extremely expensive.
Imagine uploading a 5 MB image directly to Ethereum.
The transaction fee would become absurdly high.
Sometimes hundreds or even thousands of dollars.
Clearly…
this is impractical.
So developers needed another solution.
That solution is called…
IPFS.
Step 4 — What Is IPFS?
IPFS stands for:
InterPlanetary File System
Despite the futuristic name…
the idea is actually simple.
Instead of storing your image on one company’s server…
IPFS stores files across a decentralized network.
Think about Google Drive.
When you upload a file…
Google stores it on Google’s servers.
If Google removes the file…
your link stops working.
With IPFS…
there is no single company controlling everything.
Multiple computers can store the same file.
This makes the file more resistant to censorship and server failures.
What Is a CID?
When a file is uploaded to IPFS…
it receives a unique fingerprint.
This fingerprint is called a CID (Content Identifier).
Example:
QmYwAPJzv5CZsnAzt8auVTL…
Every file gets a completely different CID.
Even changing one pixel in an image creates a completely new CID.
That’s because the CID is generated from the file’s content using cryptographic hashing.
This ensures the file cannot be secretly modified.
Why Is This So Powerful?
Suppose someone downloads your NFT image.
They edit one small pixel.
The file immediately receives a different CID.
That means the modified file is no longer identical to the original.
The blockchain can always verify which file is the authentic version linked to the NFT.
The Complete Flow So Far
At this point…
our NFT journey looks like this:
Artist Creates Artwork
│
▼
Artwork Saved
│
▼
Metadata Created
│
▼
Image Uploaded to IPFS
│
▼
CID Generated
│
▼
Metadata Updated
Notice something important.
We still haven’t touched the blockchain.
No NFT exists yet.
No ownership exists yet.
No Token ID exists yet.
Everything we’ve done so far is simply preparing the NFT before it is officially minted.
And this is exactly where the next stage begins.
In the next part, we’ll enter the blockchain itself and understand:
- What is an NFT Smart Contract?
- What is ERC-721?
- What happens when you click Mint?
- How is a Token ID created?
- How does the blockchain permanently record ownership?
- Why does minting require a wallet signature and gas fees?
This is the point where a normal digital file finally becomes a real NFT.
Step 5 — The Smart Contract: The Brain Behind Every NFT
Until now, we have:
✅ Created the artwork
✅ Created the metadata
✅ Uploaded the file to IPFS
But something is still missing.
Who will tell the blockchain that this NFT exists?
Who decides:
- Who owns it?
- Who can transfer it?
- What is its Token ID?
- Who created it?
- Which wallet owns it?
The answer is…
Smart Contracts.
What Is a Smart Contract?
Think of a Smart Contract as a robot lawyer.
Imagine selling your house.
Normally you need:
- A lawyer
- Government office
- Registry office
- Documents
- Verification
With blockchain…
all these rules are written inside computer code.
That code is called a Smart Contract.
A Smart Contract automatically enforces the rules.
Nobody has to manually approve transactions.
Nobody can secretly change the rules.
Nobody can cheat.
Everything follows the code.
Real World Example
Imagine a vending machine.
You insert ₹50.
The machine checks:
Did you insert enough money?
YES.
It automatically gives you the chocolate.
Nobody sits inside the machine.
Nobody approves your request.
The rules are already programmed.
Smart Contracts work exactly like this.
Instead of selling chocolate…
they transfer digital ownership.
Why Does Every NFT Need a Smart Contract?
Without a Smart Contract…
an NFT cannot exist.
The Smart Contract keeps track of:
- NFT Collection Name
- Owner
- Token ID
- Metadata Link
- Transfer History
- Royalties
- Mint Function
- Burn Function
- Approval Rules
Everything is controlled by code.
ERC-721 — The NFT Standard
Most NFTs on Ethereum follow something called:
ERC-721
Think of ERC-721 as a universal rulebook.
Without standards…
every NFT would behave differently.
Wallets wouldn’t understand them.
Marketplaces couldn’t display them.
Transfers would fail.
So Ethereum introduced a common standard.
ERC-721 defines:
How NFTs are created
How ownership is stored
How transfers happen
How wallets recognize NFTs
How marketplaces display NFTs
Every major NFT marketplace understands ERC-721.
That’s why an NFT minted on OpenSea can also appear in another compatible marketplace.
ERC-1155 — The Advanced Version
Later…
developers created another standard.
ERC-1155.
Instead of creating one unique NFT every time…
ERC-1155 allows:
Unique NFTs
AND
Multiple copies
inside the same Smart Contract.
That’s why many blockchain games prefer ERC-1155.
It saves gas fees.
It is more efficient.
We’ll cover this in a separate article.
Step 6 — What Happens When You Click “Mint”?
This is the moment where everything changes.
Imagine you’re on OpenSea.
You upload your artwork.
Fill in:
Name
Description
Collection
Properties
Click…
Mint
Many beginners think:
“The website creates the NFT.”
Wrong.
The website only sends a request.
The actual work happens on the blockchain.
The Complete Minting Process
Let’s see what actually happens.
User Clicks Mint
│
▼
Wallet Opens
│
▼
Transaction Created
│
▼
User Signs Transaction
│
▼
Blockchain Receives Request
│
▼
Smart Contract Executes
│
▼
New NFT Created
│
▼
Owner Assigned
│
▼
NFT Appears in Wallet
Notice something.
The website is only an interface.
The blockchain does all the important work.
Step 7 — Why Does MetaMask Open?
Suppose you’re using MetaMask.
You click Mint.
Immediately…
MetaMask opens.
Why?
Because the blockchain needs your permission.
Anyone can visit OpenSea.
Anyone can upload images.
But nobody should be able to create NFTs using YOUR wallet without permission.
So your wallet asks:
“Do you approve this transaction?”
Only after you approve…
the process continues.
What Is a Digital Signature?
When you click Approve…
your wallet creates something called a Digital Signature.
This is NOT your password.
This is NOT your Private Key.
Your Private Key never leaves your wallet.
Instead…
the wallet uses the Private Key to mathematically sign the transaction.
Think of it like signing a legal document.
Anyone can read the document.
But only your signature proves you approved it.
Blockchain works exactly the same way.
Step 8 — Gas Fees
Another question beginners ask is:
Why do I have to pay gas fees?
Because blockchain computers don’t work for free.
Thousands of computers around the world verify your transaction.
These computers are called:
Validators
(or Miners on Proof of Work networks.)
They process your transaction.
Execute the Smart Contract.
Store the blockchain record.
Update ownership.
For this work…
they receive a small payment.
That payment is called:
Gas Fee.
Think of it as paying courier charges to register an important legal document.
Step 9 — Blockchain Verifies Everything
Once your transaction reaches Ethereum…
thousands of nodes independently verify it.
Every node checks:
✅ Is the signature valid?
✅ Does the wallet own enough ETH?
✅ Is the Smart Contract valid?
✅ Has this NFT already been minted?
✅ Are all rules satisfied?
Only after every verification passes…
the transaction is added to a new block.
Now…
the NFT officially exists.
This is the exact moment of Minting.
Step 10 — Token ID Is Born
Every NFT receives something extremely important.
A Token ID.
Example:
Collection:
Coin Alert Genesis
Token ID:
#0001
Or
Token ID:
54892
The Token ID acts like a passport number.
No two NFTs inside the same collection can have the same Token ID.
Even if two NFTs use identical images…
their Token IDs are different.
That’s why blockchain can always distinguish between them.
Step 11 — What Gets Stored on the Blockchain?
This is probably the biggest misunderstanding about NFTs.
Many people believe Ethereum stores the image itself.
It doesn’t.
Instead, the blockchain stores something like this:
Contract Address
↓
Token ID
↓
Owner Wallet Address
↓
Metadata URI
↓
Transaction History
↓
Timestamp
That’s it.
The actual JPG or PNG is usually stored on IPFS.
The blockchain stores the proof, not the file.
Think of it like a property registry.
The government registry doesn’t store your house.
It stores information about your house and who owns it.
The house exists elsewhere.
Exactly the same principle applies to NFTs.
The NFT Is Now Official
Once the blockchain records all this information:
- The NFT exists forever (unless burned).
- Ownership can be verified by anyone.
- Wallets can detect it.
- Marketplaces can display it.
- Anyone can check its transaction history.
At this point, the NFT is no longer just a digital image.
It has become a blockchain-based digital asset with verifiable ownership.
Complete Flow So Far
Artist Creates Artwork
│
▼
Metadata Created
│
▼
Image Uploaded to IPFS
│
▼
Smart Contract Ready
│
▼
User Clicks Mint
│
▼
Wallet Signs Transaction
│
▼
Gas Fee Paid
│
▼
Blockchain Verifies Transaction
│
▼
Token ID Generated
│
▼
Ownership Recorded Forever
│
▼
NFT Appears Inside Wallet
At this stage, the NFT has officially been born.
But the journey is still not complete.
In the next part, we’ll answer the questions almost every beginner asks:
- How does an NFT appear inside your wallet?
- What actually happens when you buy an NFT?
- How does ownership transfer from seller to buyer?
- Can someone steal or copy your NFT?
- What happens if you take a screenshot?
- Real Coin Alert NFT example from creation to sale.
- Common myths, future use cases, FAQs, CTA, image prompts, and authoritative sources.
This final part will connect every concept into one complete picture.
Step 12 — Why Does the NFT Appear Inside Your Wallet?
Congratulations.
Your NFT has now been minted.
But here’s another question beginners ask:
“Where is my NFT actually stored?”
Many people think:
“My NFT is stored inside MetaMask.”
This is not true.
Your wallet doesn’t actually store NFTs.
In fact…
Your wallet doesn’t even store cryptocurrencies.
Sounds strange?
Let’s understand.
What Does a Crypto Wallet Actually Store?
Think about your Gmail account.
Are your emails stored inside Chrome?
No.
Chrome simply allows you to access Gmail.
Similarly…
MetaMask is just a tool that lets you access your blockchain assets.
Your NFT always remains recorded on the blockchain.
The wallet simply reads the blockchain and displays assets belonging to your wallet address.
So instead of thinking:
NFT → Wallet
Think like this:
Blockchain
│
▼
Wallet Reads Blockchain
│
▼
Shows Your NFT
The wallet is only a viewer.
Ownership always exists on-chain.
How Does MetaMask Know Which NFT Belongs to You?
Every wallet has a unique blockchain address.
Example:
0xA52F………….7C91
When MetaMask opens…
it asks Ethereum:
“Show me every NFT owned by this wallet.”
Ethereum returns the answer.
MetaMask simply displays it.
Nothing is stored locally.
Step 13 — Listing an NFT on a Marketplace
Now suppose you want to sell your NFT.
You visit OpenSea.
Click:
Sell
Enter:
Price
Duration
Currency
Then click:
List
Many beginners think:
“The NFT has been transferred.”
No.
Nothing has been sold yet.
Listing only creates permission for the marketplace to sell your NFT under specific conditions.
Ownership is still yours.
What Actually Happens During Listing?
When you click List NFT:
Wallet Opens
│
▼
Approve Marketplace
│
▼
Sign Transaction
│
▼
Marketplace Gets Selling Permission
Notice something.
You are not transferring ownership.
You’re only giving OpenSea permission to complete the sale if a buyer appears.
Step 14 — What Happens When Someone Buys Your NFT?
Now imagine someone purchases your NFT.
Behind the scenes…
this happens.
Buyer Clicks Buy
│
▼
Wallet Opens
│
▼
Buyer Signs Transaction
│
▼
Blockchain Verifies Payment
│
▼
Smart Contract Executes
│
▼
Ownership Changes
│
▼
Seller Receives Payment
│
▼
Buyer’s Wallet Shows NFT
Everything happens automatically.
No employee approves it.
No company manually transfers ownership.
The Smart Contract performs the entire process.
Step 15 — Ownership Changes Forever
After purchase…
Ethereum updates one field.
The Owner Address.
Before sale:
Owner
↓
0xABC123…
After sale:
Owner
↓
0xXYZ789…
That’s it.
The blockchain now recognizes the buyer as the official owner.
Anyone in the world can verify this instantly.
Step 16 — What Happens to the Seller?
At the same time…
the seller receives payment.
Example:
Buyer pays:
2 ETH
Distribution may look like:
Seller
↓
1.90 ETH
Marketplace Fee
↓
0.05 ETH
Creator Royalty
↓
0.05 ETH
Everything is calculated automatically by the Smart Contract.
Nobody needs to calculate commissions manually.
Step 17 — What Happens If Someone Takes a Screenshot?
This is probably the most famous NFT question ever.
“I can just take a screenshot.”
Yes.
You absolutely can.
Anyone can.
Let’s compare it with real life.
Imagine someone visits the Louvre Museum.
They take a photo of the Mona Lisa.
Do they now own the Mona Lisa?
Of course not.
Exactly the same applies to NFTs.
When someone screenshots your NFT…
they only copy the image.
They do not receive:
- Ownership
- Token ID
- Blockchain Record
- Transfer History
- Creator Information
- Smart Contract Verification
The blockchain still recognizes the original owner.
A screenshot is only a picture.
The NFT is the ownership record.
Step 18 — Can NFTs Be Copied?
Another common myth.
People ask:
“Can NFTs be copied?”
Let’s separate two things.
The Image
Yes.
Anyone can copy it.
The NFT
No.
The blockchain record cannot simply be copied.
Why?
Because every NFT has:
- Contract Address
- Token ID
- Transaction History
- Wallet Owner
- Blockchain Verification
Duplicating these records is practically impossible without creating a completely different NFT.
Even if two NFTs use the same image…
their blockchain identity is different.
Real Coin Alert Example
Let’s imagine Coin Alert launches an NFT collection.
Step 1
You create this artwork.
Coin Alert Genesis #1
Step 2
The image is uploaded to IPFS.
It receives:
CID:
QmABCD123…
Step 3
Metadata is created.
{
“name”: “Coin Alert Genesis #1”,
“image”: “ipfs://QmABCD123…”,
“collection”: “Coin Alert Genesis”
}
Step 4
You mint the NFT.
Ethereum generates:
Contract Address
↓
0x81F….
Token ID
↓
#1
Step 5
The NFT appears in your wallet.
Owner:
XYZ Wallet
Step 6
You list it on OpenSea.
Price:
1 ETH
Step 7
Someone purchases it.
Ethereum updates ownership.
Now:
Owner
↓
Buyer’s Wallet
The blockchain permanently stores the entire history.
Anyone can verify:
- Creator
- Mint Date
- Sale History
- Current Owner
- Previous Owners
Everything is transparent.
What Actually Happens Inside the Blockchain During NFT Minting?
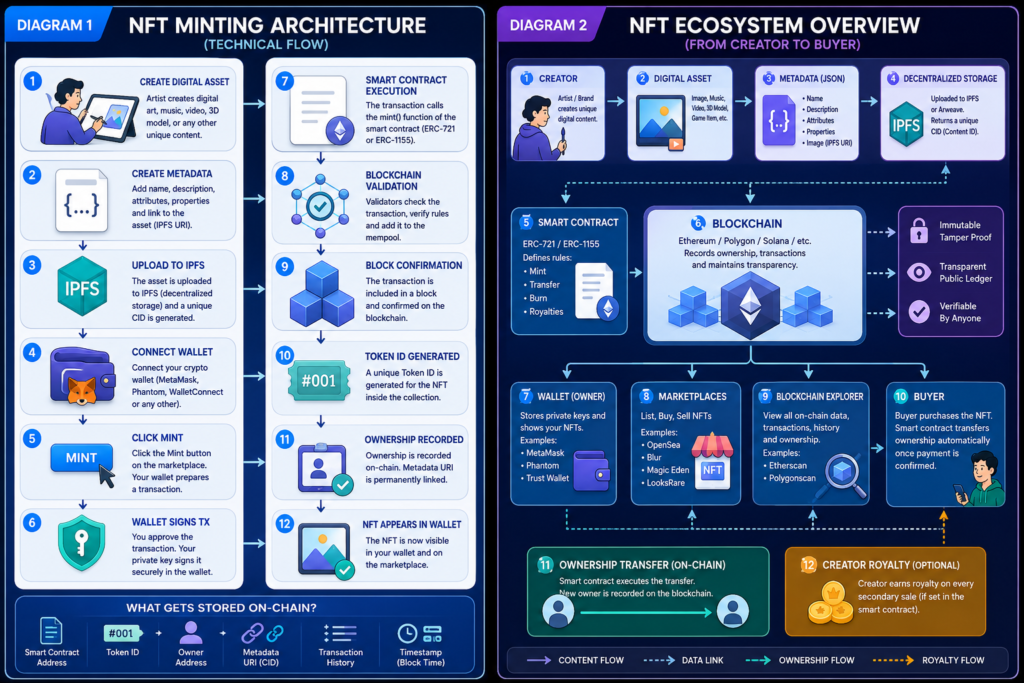
Imagine you click the Mint button on OpenSea.
From your point of view…
everything seems very simple.
You click one button.
Wait a few seconds.
And suddenly…
your NFT appears inside your wallet.
But behind the scenes…
hundreds of things happen within just a few seconds.
Let’s slow everything down and watch the entire process step by step.
Stage 1 — OpenSea Does NOT Create Your NFT
This is one of the biggest misconceptions.
Most beginners think OpenSea creates NFTs.
It doesn’t.
OpenSea is only a user interface.
Think of OpenSea like an ATM.
When you withdraw money…
the ATM doesn’t create money.
It only communicates with your bank.
Similarly…
OpenSea communicates with the Ethereum blockchain.
The blockchain performs the actual work.
Stage 2 — Wallet Creates a Transaction
The moment you press Mint…
MetaMask prepares a blockchain transaction.
Inside that transaction is information like:
Wallet Address
↓
Smart Contract Address
↓
Mint Function
↓
Metadata URI
↓
Gas Limit
↓
Gas Price
Nothing has happened on the blockchain yet.
Your wallet has only prepared a request.
Stage 3 — Private Key Signs the Transaction
This is one of blockchain’s greatest innovations.
Your wallet asks:
“Do you approve this transaction?”
When you click Confirm…
MetaMask uses your Private Key to generate a cryptographic signature.
Important:
Your Private Key is never sent to OpenSea.
It is never uploaded to Ethereum.
It never leaves your wallet.
Instead…
it creates a mathematical proof that only you could have approved this transaction.
This is why your wallet remains secure.
Stage 4 — Transaction Broadcast
Now your wallet broadcasts the signed transaction.
Not to one computer.
Not to OpenSea.
But to thousands of Ethereum nodes around the world.
Every node receives the same request.
Stage 5 — Validators Check Everything
Each validator independently checks:
✅ Is the digital signature valid?
✅ Does the sender own enough ETH?
✅ Is the Smart Contract genuine?
✅ Is the metadata link valid?
✅ Has this Token ID already been used?
If even one important rule fails…
the transaction is rejected.
No NFT is created.
Stage 6 — Block Creation
If everything is valid…
the transaction is selected for a new Ethereum block.
That block contains hundreds of transactions.
Your NFT mint is only one of them.
Once the block is finalized…
your NFT officially becomes part of Ethereum’s permanent history.
From this moment…
it becomes practically impossible to remove or secretly modify it.
Stage 7 — Event Emission
The Smart Contract now emits blockchain events.
One of the most important is:
Transfer(
From: 0x000000…
To: Your Wallet
Token ID: 1
)
Notice something interesting.
The NFT came from:
0x0000000000000000000000000000000000000000
This special address is called the Zero Address.
It represents that the NFT did not previously exist.
When a token is minted…
it is transferred from the Zero Address to the creator.
This is how blockchain records the birth of every NFT.
Why OpenSea Immediately Shows Your NFT
OpenSea doesn’t store your NFT.
It simply watches blockchain events.
The moment Ethereum emits the Transfer event…
OpenSea detects it.
Then it reads:
- Contract Address
- Token ID
- Metadata URI
It downloads the metadata from IPFS.
Then downloads the artwork.
Finally…
it displays everything beautifully on your profile.
This Is the Complete Backend Flow
Artist Creates Artwork
│
▼
Metadata Created
│
▼
Image Uploaded to IPFS
│
▼
Wallet Connects
│
▼
Mint Button Clicked
│
▼
Transaction Prepared
│
▼
Private Key Signs
│
▼
Transaction Broadcast
│
▼
Validators Verify
│
▼
Block Created
│
▼
Transfer Event Emitted
│
▼
Token ID Generated
│
▼
Ownership Recorded
│
▼
Marketplace Reads Blockchain
│
▼
NFT Appears on OpenSea
Biggest NFT Myths
Myth 1
NFT = JPEG
❌ Wrong
NFT is blockchain ownership.
Myth 2
NFT images are stored on Ethereum.
❌ Wrong
Most are stored on IPFS or Arweave.
Myth 3
Screenshots steal NFTs.
❌ Wrong
Screenshots copy images.
Not ownership.
Myth 4
NFTs are only for digital art.
❌ Wrong
NFTs can represent:
- Event Tickets
- Certificates
- Luxury Goods
- Real Estate
- Memberships
- Gaming Items
- Identity
- Music Rights
- Collectibles
Myth 5
Every NFT is valuable.
❌ Wrong.
Value depends on:
- Utility
- Community
- Scarcity
- Demand
- Creator Reputation
- Real Use Case
Why NFTs Matter Beyond Art
This is where many beginners miss the bigger picture.
NFTs are not just collectibles.
They are a technology for proving digital ownership.
In the future, NFTs can represent:
- Property documents
- University degrees
- Medical records
- Event tickets
- Luxury product authenticity
- Vehicle ownership
- Intellectual property
- Real World Assets (RWAs)
- AI-generated digital identities
The image is only one possible use case.
The real innovation is verifiable digital ownership.
Final Thoughts
If you remember only one thing from this article, let it be this:
An NFT is not the image.
An NFT is the blockchain record that proves ownership of a digital asset.
Images can be copied.
Ownership cannot.
That single difference is what made NFTs one of the biggest innovations in blockchain technology.
Also Read
Also Read
FAQ
1. Is an NFT just an image?
No. An NFT is a blockchain-based ownership record. The image is only the associated digital asset.
2. Where is an NFT stored?
Ownership is stored on the blockchain, while the media file is usually stored on IPFS, Arweave, or another decentralized storage network.
3. Can I copy an NFT?
You can copy the image, but not the blockchain ownership record.
4. Why do NFTs have gas fees?
Gas fees pay blockchain validators to process and permanently record transactions.
5. Can NFTs represent things other than art?
Yes. They can represent tickets, memberships, certificates, gaming assets, real-world assets, and much more.
Continue Your NFT Learning Journey 🚀
Now that you understand how NFTs work, continue exploring blockchain technology with Coin Alert’s beginner-friendly guides.
What Is an NFT? | NFT vs Cryptocurrency | Blockchain Guide | Ethereum Guide
🌐 Website: https://coinalert.in
📢 Telegram: https://t.me/+u20qP92PAzxkYjE1
▶ YouTube: https://www.youtube.com/@coinalertx

Dr. Khushwant Rana is the founder of Coin Alert and has 15+ years of business experience. He creates beginner-friendly crypto educational content focused on Bitcoin, blockchain, Web3, crypto security, and real-world crypto awareness in India.