What Is NFT Minting?
In our previous guide, How Does an NFT Work?, we learned how NFTs store ownership information on a blockchain and why every NFT is unique.
The next logical question is:
How does an NFT actually get onto the blockchain?
The answer is simple.
Through a process called NFT Minting.
NFT Minting is the process of converting a digital file into a blockchain asset. During this process, the blockchain permanently records important information about the NFT, including ownership, metadata, smart contract details, transaction history, and a unique Token ID.
Before minting, an image is simply a normal digital file that anyone can copy.
After minting, the blockchain recognizes that file as a unique NFT with verifiable ownership.
This is the reason why collectors can verify authenticity and creators can prove ownership without depending on a central company.
Why Is NFT Minting Important?
Many beginners believe that uploading an image to OpenSea automatically creates an NFT.
That is not entirely true.
The blockchain only recognizes an NFT after the minting process is completed.
Minting provides several important benefits:
- Creates a permanent blockchain record.
- Assigns a unique Token ID.
- Records the owner’s wallet address.
- Links metadata with the NFT.
- Makes ownership publicly verifiable.
- Allows marketplaces like OpenSea to display the NFT.
- Creates a complete transaction history.
Simple Example
Imagine you paint a beautiful picture.
Until someone officially registers it, anybody can claim it belongs to them.
NFT Minting works like an official digital registration office.
Once the blockchain records your NFT, everyone can verify that you are the original owner.
How NFT Minting Works
Although NFT minting sounds technical, the complete process can be understood in a few simple steps.
Every NFT follows nearly the same journey before appearing inside a wallet or marketplace.
Step 1 — Create the Digital Asset
Everything starts with a digital file.
This could be:
- Digital Artwork
- Photography
- Music
- Video
- Animation
- 3D Model
- Collectible Card
- Game Asset
At this stage, it is still just a normal digital file.
It is NOT yet an NFT.
Step 2 — Create NFT Metadata
The next step is preparing metadata.
Metadata acts like the identity card of an NFT.
It normally contains:
- NFT Name
- Description
- Creator Information
- Image Location
- Attributes
- Collection Name
- External Website
This metadata will later be connected to the blockchain through a smart contract.
Step 3 — Upload the NFT to IPFS
Once the artwork and metadata are ready, they need to be stored somewhere permanently.
Saving NFT images on a normal web server is not a good idea because the file could be deleted, changed, or the server could go offline.
For this reason, most NFT projects use a decentralized storage system called IPFS (InterPlanetary File System).
IPFS stores files across a distributed network instead of relying on a single server.
Every uploaded file receives a unique identifier known as a CID (Content Identifier).
For example:
Artwork
↓
Upload to Pinata
↓
CID Generated
↓
ipfs://Qmxxxxxxxxxxxxxxxx
The metadata file is uploaded in exactly the same way and also receives its own CID.
Later, the smart contract uses these CIDs to permanently connect the NFT with its artwork and metadata.
Popular IPFS Storage Services
- Pinata
- Lighthouse
- NFT.Storage
- Web3.Storage
At Coin Alert, our Founder NFT collection also follows this workflow by storing NFT data securely before blockchain registration.
Step 4 — Connect Your Crypto Wallet
Before an NFT can be minted, you need a Web3 wallet.
Your wallet acts as your digital identity on the blockchain.
It signs transactions, proves ownership, and receives the NFT after minting.
Some of the most popular NFT wallets include:
- MetaMask
- Coinbase Wallet
- Trust Wallet
- Rabby Wallet
Once your wallet is connected to the marketplace, it becomes ready to interact with the blockchain.
Without a wallet, NFT minting cannot happen.
Step 5 — Smart Contract Creates the NFT
This is the most important step in the entire minting process.
A Smart Contract is a self-executing blockchain program that controls how an NFT collection works.
Instead of depending on a company or website, the blockchain automatically follows the rules written inside the smart contract.
During the minting process, the smart contract records important information such as:
- Token ID
- NFT Collection Name
- Maximum Supply
- Current Owner
- Metadata URI
- Royalty Percentage
- Blockchain Timestamp
Because these rules are permanently stored on the blockchain, nobody can secretly change ownership records later.
This is one of the biggest reasons NFTs are considered transparent and verifiable digital assets.
How Smart Contracts Work During Minting
Think of a Smart Contract as the rulebook of an NFT collection.
It controls everything automatically, including:
- How many NFTs can ever exist.
- Who is allowed to mint.
- Whether the mint is Public or Private.
- Royalty percentage for future sales.
- Metadata location.
- Ownership transfers.
- Collection settings.
Without a smart contract, NFTs simply cannot exist on a blockchain.
Step 6 — Pay the Gas Fee
Every blockchain transaction requires network resources.
When you mint an NFT, blockchain validators verify your transaction and permanently add it to the blockchain.
For this work, the network charges a small transaction fee known as a Gas Fee.
Gas fees vary depending on the blockchain.
| Blockchain | Typical Gas Cost |
| Ethereum | High |
| Base | Low |
| Polygon | Very Low |
| Solana | Very Low |
This is one of the main reasons many new NFT creators prefer networks like Base or Polygon, where minting costs are significantly lower than Ethereum Mainnet.
Step 7 — NFT Is Officially Minted
After the blockchain confirms the transaction, your NFT officially comes into existence.
The blockchain automatically generates:
- Unique Token ID
- Owner Wallet Address
- Transaction Hash
- Contract Address
- Mint Timestamp
- Metadata Link
At this point, your NFT becomes a permanent blockchain asset.
Even if someone copies your image, they cannot copy the blockchain ownership attached to your NFT.
Step 8 — NFT Appears on NFT Marketplaces
Once the minting transaction is confirmed, NFT marketplaces automatically detect the new NFT.
Platforms such as OpenSea read the smart contract and metadata directly from the blockchain.
After a few moments, your NFT becomes visible inside your wallet and your NFT collection.
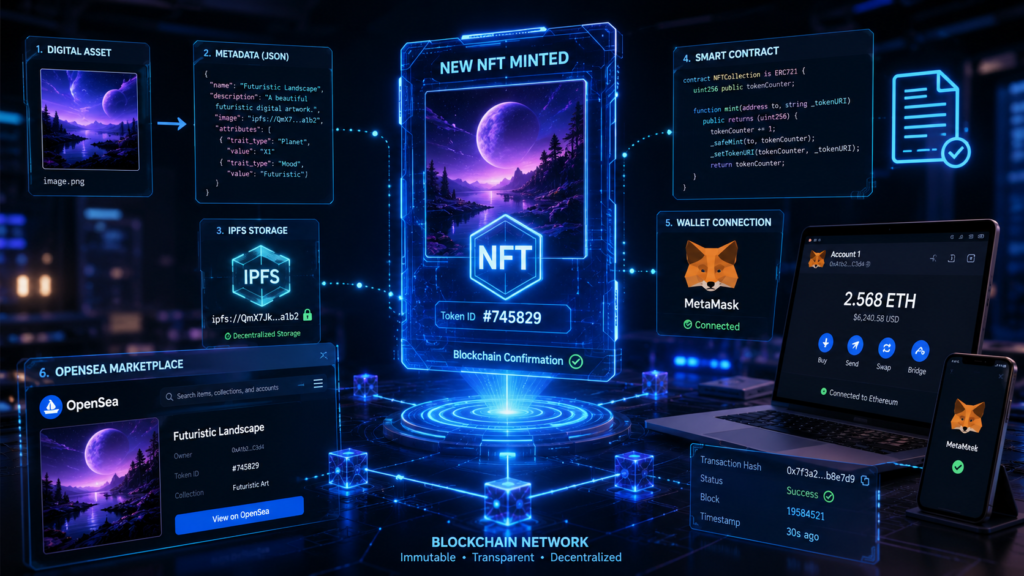
The complete NFT minting process looks like this:
Digital Artwork
↓
Create Metadata
↓
Upload to IPFS
↓
Connect Wallet
↓
Smart Contract
↓
Pay Gas Fee
↓
Blockchain Confirms Transaction
↓
NFT Minted
↓
Appears on OpenSea
What Are Gas Fees?
Many beginners think that OpenSea charges gas fees.
This is a common misconception.
Gas fees are not charged by OpenSea.
Instead, they are paid directly to the blockchain network for processing and securing transactions.
Without validators confirming transactions, NFTs could never become permanent blockchain assets.
Gas fees help maintain the security and decentralization of the blockchain network.
What Is Lazy Minting?
Traditional minting creates an NFT immediately after the blockchain transaction is confirmed.
Lazy Minting works differently.
Instead of paying blockchain fees upfront, the NFT is only minted when someone purchases it.
This approach allows creators to publish NFT collections without paying gas fees in advance.
Once the first buyer purchases the NFT, the blockchain completes the minting process automatically.
This method has become popular among beginner creators who want to reduce initial costs.
Different Types of NFT Minting
Not every NFT collection follows the same minting process. Depending on the project’s goals, creators may choose different minting methods.
1. Public Mint
Public Mint is the most common type of NFT launch.
Anyone can participate once the mint goes live.
Users simply connect their wallet, pay the required mint price (if any), approve the blockchain transaction, and receive their NFT.
Most large NFT collections begin with a Public Mint after completing whitelist or private sale phases.
2. Private Mint
Private Mint is available only to selected wallets.
Project founders usually reserve this phase for:
- Team Members
- Developers
- Investors
- Strategic Partners
- Advisors
Since access is restricted, the public cannot participate during this stage.
3. Whitelist Mint
Whitelist Mint rewards early supporters.
Only wallets that have been approved in advance can mint NFTs before the public launch.
Projects often create a whitelist by rewarding users who:
- Join Discord
- Follow social media
- Participate in community events
- Complete specific tasks
Whitelist minting also helps reduce bot activity and gives genuine community members a fair opportunity.
4. Free Mint
In a Free Mint, the NFT itself costs nothing.
However, users may still need to pay blockchain gas fees depending on the network.
Many Web3 projects use Free Mint campaigns to grow their communities quickly.
5. Paid Mint
Paid Mint is the traditional NFT launch model.
Users pay both:
- NFT Mint Price
- Blockchain Gas Fee
The amount varies depending on the blockchain and the project.
Coin Alert Founder NFT Example
Let’s understand NFT minting using the Coin Alert Founder NFT ecosystem.
The complete process looks like this:
Step 1
The Founder NFT artwork was designed.
Step 2
Metadata was created for every NFT.
Step 3
Artwork and metadata were uploaded to decentralized storage (IPFS).
Step 4
A Smart Contract was deployed on the blockchain.
Step 5
Each NFT received its own unique Token ID.
Step 6
The collection became visible on OpenSea.
Step 7
NFT holders could later verify ownership through the Coin Alert Founder ecosystem.
Step 8
The NFT became the user’s digital identity inside the Coin Alert Web3 ecosystem.
This example shows that NFT Minting is much more than simply uploading an image.
It is a complete blockchain registration process that creates authenticity, ownership, and transparency.
Common NFT Minting Mistakes
Many beginners make avoidable mistakes while minting NFTs.
Here are some of the most common ones:
- Connecting a wallet to fake NFT websites.
- Sharing the Secret Recovery Phrase.
- Ignoring the Smart Contract address.
- Minting without checking gas fees.
- Clicking fake OpenSea links.
- Approving suspicious wallet transactions.
- Buying NFTs from unverified collections.
Coin Alert Security Tip
Always verify the official Smart Contract address before minting or purchasing any NFT.
Never share your wallet’s Secret Recovery Phrase or Private Keys with anyone.
Legitimate NFT projects will never ask for your recovery phrase.
Frequently Asked Questions (FAQs)
Can I mint an NFT for free?
Yes.
Some marketplaces support Free Mint or Lazy Minting, although blockchain gas fees may still apply depending on the network.
Is NFT Minting the same as buying an NFT?
No.
Minting creates a brand-new NFT on the blockchain.
Buying simply transfers ownership of an already existing NFT.
Which blockchain is best for beginners?
Many beginners prefer Base or Polygon because their transaction fees are generally much lower than Ethereum Mainnet.
Can I sell my NFT after minting?
Yes.
Once your NFT has been successfully minted, you can list it for sale on supported NFT marketplaces such as OpenSea.
Why is metadata important?
Metadata contains the NFT’s identity.
It stores important information including:
NFT Name
Description
Artwork Location
Attributes
External Links
Without metadata, the NFT would not have a meaningful identity.
Final Thoughts
NFT Minting is one of the most important concepts in Web3 because it transforms a normal digital file into a unique blockchain asset.
Once you understand how artwork, metadata, IPFS, wallets, smart contracts, gas fees, and blockchain transactions work together, the entire NFT ecosystem becomes much easier to understand.
Whether you are an NFT creator, collector, or Web3 enthusiast, learning NFT Minting is the first practical step toward building and participating in the decentralized digital economy.
In the next guide, we’ll move from theory to practice and learn How to Mint Your First NFT Step by Step, where you’ll see the complete minting process from wallet connection to publishing an NFT on the blockchain.
Related Coin Alert Guides
External Resources
Continue Your Web3 Journey with Coin Alert 🚀
Learning NFT Minting is just the beginning. Join the Coin Alert community to explore blockchain, NFTs, Web3, DeFi, cryptocurrency security, and practical tutorials designed for beginners.
📚 Continue Reading
- 👉 How Does an NFT Work?
- 👉 How to Buy Coin Alert Founder NFT
- 👉 Start Your Founder Journey
- 👉 Next Article: How to Mint Your First NFT (Step-by-Step Guide)
If you found this guide helpful, consider sharing it with your friends and fellow Web3 learners. Every share helps us educate more people about blockchain technology.
🚀 Learn. Build. Grow with Coin Alert.

Dr. Khushwant Rana is the founder of Coin Alert and has 15+ years of business experience. He creates beginner-friendly crypto educational content focused on Bitcoin, blockchain, Web3, crypto security, and real-world crypto awareness in India.